Semua pasti masih ingat part ini, part yang mungkin sempat jadi favorit para skaters pada era 2002. Yeah, partnya Paul Rodriquez di Transworld In Bloom.
Bedanya pada video ini, Paul Rodriquez ikut memberi komentar terhadap partnya ini. Dia menceritakan bagaimana dia selama ini bisa menjadi skateboarder yang sangat berpengaruh dalam dunia skateboard kurun waktu 10 tahun terakhir ini, setidak-tidaknya itulah yang dikatakan dalam Transworld edisi Februari 2010.
Cheers!

How have your footwear sales been in 2009 versus 2008?
Footwear sales are down for us about sixteen percent.
How has the number of styles you stock on your shoe wall changed over the past twelve months?
We have cut down the number of shoes on the wall by about 20 to 25 styles.
What brands does your store carry, and of those brands, which are the best sellers this year?
We carry etnies, éS, Emerica, Nike SB, Lakai, DVS, Vans, C1RCA, Adio, Osiris, Vox, DC, Fallen, Cons, and adidas. Our best sell-through per brand has been Circa, Lakai, Vans, Emerica, and Nike SB, in that order. etnies came on strong at the end of 2009.
What’s the number one trend you’ve seen emerge over the past season?
The number one trend is the price at which people are shopping for—what is on sale. No matter what brand, style, cupsole, vulc, or color, it is all about price.
Are vulcanized shoes selling well in your store?
Vulcanized are doing really well right now and have been for about two years. I think the trend will last until kids realize board feel isn’t as important as being able to walk when you’re older! Cupsole, on the other hand, is almost nonexistent in our shop for 2009 and almost no presence prebooked for 2010.
What do you expect to retail well in 2010?
It’s hard to tell what’s going to happen for next year, shoe sales are so low it doesn’t leave me with much confidence in one brand more than any other. A lot of the shoes even look alike.
Are you planning to bring in any new brands next season?
The only brand I see new in the store next year is maybe a small run from Habitat. They have simple silhouettes and decent prices.
 The Year Punk Broke

1991: The Year Punk Broke is a 1992 documentary directed by Dave Markey featuring American alternative rock band Sonic Youth on tour in Europe in 1991. While Sonic Youth is the focus of the documentary, the film also gives attention to Nirvana, Dinosaur Jr., Babes in Toyland, Gumball and The Ramones. Also featured in the film are Mark Arm, Dan Peters and Matt Lukin of Mudhoney, Courtney Love, and Joe Cole, who was murdered in a robbery three months after the tour ended. The film is dedicated to him.


Foundation Skateboards would like to give a warm welcome to Dan Murphy who joins our pro team. Head over to the Foundation site to see his welcome video and interview.
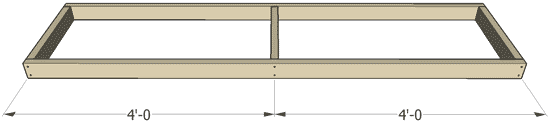
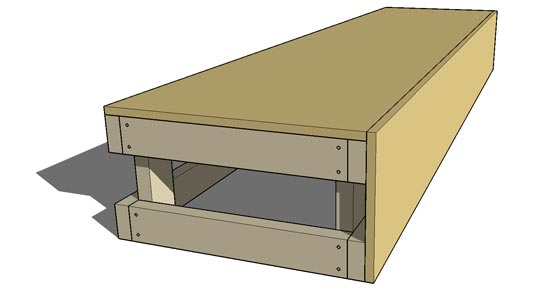
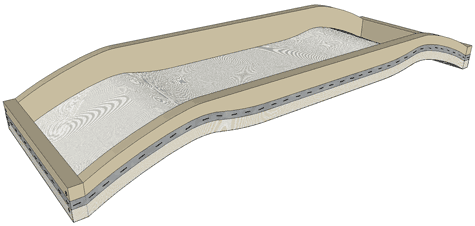
A skateboard grind ledge is easy to build and doesn't take much wood. The this grind ledge is 8' long, 2' wide and a 1' tall.
As with all structures here on DIYskate, you can build this grind ledge any size you want. However, for the material list to be accurate you will need to follow the plans as listed below.
The wood and hardware can be found at most home improvement stores. Sometimes you can find the steel there as well, I know my local Home Depot carries the coping and threshold material.
If not, check the phone book. Look up Steel, Steel Yards, Steel Fabricators, Scrap Steel & anything else with Steel in the title.
If this ramp is going to stay outside, it needs to be protected from the elements. A good place to start is with pressure treated lumber, paint and a tarp. You may want to invest in a composite material for the surface too. Such as Skate Lite or Ramp Armor.
Be extra careful when working with treated lumber though, the chemicals used to treat the wood contain a poisonous pesticide.
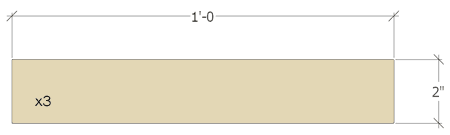
Gather your materials. Start with the 2×4's. Cut twelve pieces at 1'-9 in length (you will get four out of each 8' long 2×4). Set them aside. Cut six pieces at 1'-0, these determine the height of the grind ledge. Below is a cut list referencing what else you will need and it's size.
| Material Cut List | |||||||||||||||||||||||||||||||||||||||||||||||||||||||||||||||||||||||||||||||||||||||||||||||||||||||||||||||||
|
|
| |||||||||||||||||||||||||||||||||||||||||||||||||||||||||||||||||||||||||||||||||||||||||||||||||||||||||||||||
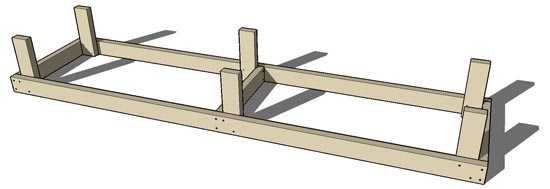
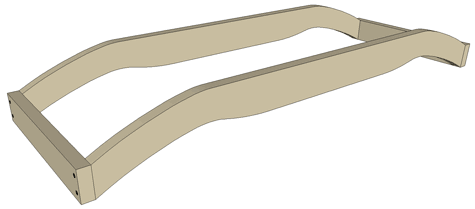
Now build the bottom of the box to look like this below.
You will use the last two 2×4's at 8'-0 for the sides and three of the 1'-9 pieces for the framing. The one in the middle is centered.
You should pre-drill the screw locations near the ends with a 1/16" drill bit to keep them from splitting.
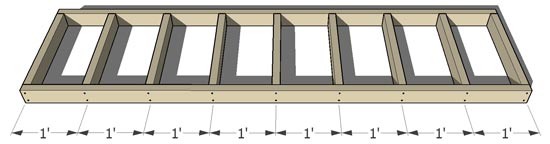
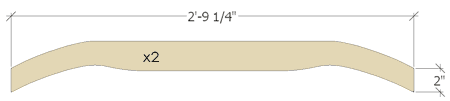
Build the top of the grind ledge to look like this. Using two of the uncut 2×4's for the sides and nine of the 1'-9 pieces placed every 1'-0 on center as shown. If your trying to make the box lighter, you can use only five of the 1'-9 long pieces here. Just remember, these are what hold the top up. If you plan on skating the crap out of this box, nine might be a better option.
Attach the six pieces that are 1'-0 in length to the bottom of the box like shown here. Put four screws in each piece, two through each side.
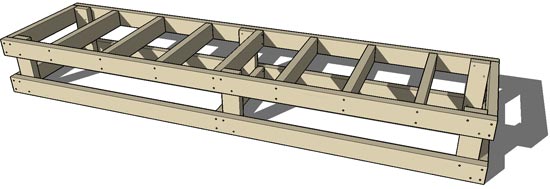
Place the top on the newly attached sides. This is much easier if you flip the bottom over or lay it on its side. Put four screws in each just like the bottom. Make sure the ledge is square. If you don't the box will rock on the ground like a wobbly table.
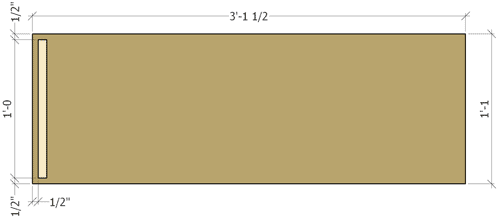
Your done framing the box. Now you want to attach the plywood as shown in the picture. Cut the top layer 2'-0 wide and the side plywood at 1-0 3/4". If you changed the height of the box just cut the side plywood 3/4" taller than your box so you can cover the top sheet of plywood.
Place the angle iron on the edge of box like shown. Drill a 3/16" hole on each end on both sides where shown. The top and bottom dimensions are offset so the screws won't hit each other. On a box this length you need to place a couple more screws about 2'-6 apart on each side.
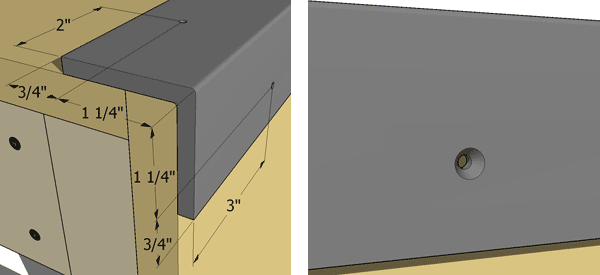
Once drilled, countersink each by using the 3/8" drill bit to drill down just enough so the screw heads are flush with the coping. This will keep your trucks and board from hitting them when you grind or slide.
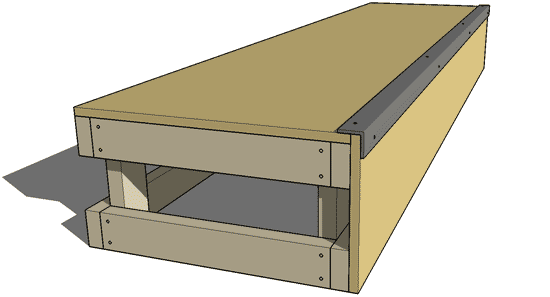
Congratulations, you have just finished building a solid skateboard grind ledge that will last. Give it some paint and stickers then it's time to get your kickflip backside smiths on lock. Good luck. (source from DIYSKATES.COM)
Do you want to know how to make a silk screen press to silk screen skateboard decks from nose to tail? Then keep reading.
This silk screen press should work on most double kick tail skateboards, but you may need to tweak the design for your particular deck. Before you get started, please read the entire article and try to have a good understanding of the process.
Also, keep in mind that each skateboard is a little bit different from each other and you may have to do some figuring of your own on this press - gasp! This is just the general idea.
Quick note about these. You can not use the emulsion technique with this curved screen. Do some research on "Drawing Fluid" for more information on the alternate technique.
Gather the materials called for in the material list to your right. The wood and hinges should easily be found at most home improvement stores such as Lowe's, Home Depot or Menard's
The actual silk screen material and other supplies used for screening the skateboard can be found at local hobby stores like Michaels, Hobby lobby, etc... Also take a look at online stores such as Blick Art Materials for a larger selection.
This set of plans covers how to make a silk screen press for skateboards, not how to do the silk screening itself. I will cover silk screening and graphics in a separate set of articles later.
Start by printing out these four pdf drawings for the sides of the press.
Make sure these drawings are printed to scale, filling up four an 8 1/2" x 11" sheets of paper. I have included a 2" logo on these drawings which you can measure to check scale.
| PDF drawings | Left Screen #1 | Left Screen #2 | Right Screen #3 | Right Screen #4 |
Trace, or spray adhesive the printed drawings onto the 3/4" thick wood for the sides.
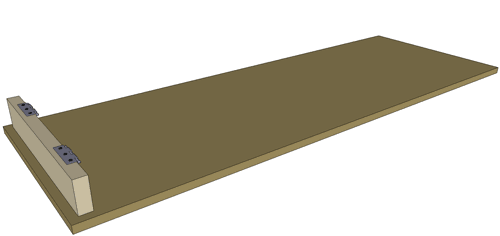
Now cut the three pieces of 3/4" thick wood to 1' × 2" for the ends.
Cut a piece of 3/4" wood to 1'-1 × 3'-1 for the base.
Place one of the previously cut 1' × 2" ends on the base 1/2" in on the sides and end as shown below. Use 1 1/4" screws and wood glue to attach it to the base and set it aside for now.
Using the remaining two ends, attach them to each side with 1 1/4" screws (two per connection) and a bit of wood glue. Pre-drill the screw hole locations with a 1/16" drill bit to avoid splitting.
When assembling the frame, it's a good idea to construct it on a level surface. Making it easier to keep it square, which is essential to a good screen press.
After the frame has been assembled, you can stretch the silk screen fabric over it.
You can use hot melt glue or staples and a staple gun to attach the fabric to the frame. If you choose staples, you will need to reinforce the fabric by covering the edges with duct tape and folding it over, leaving about 3/4" to staple through. This keeps the fabric from ripping.
To stretch the fabric, start at one end and secure it to the frame, then work your way down the sides until you reach the other end and attach it there as well. Your goal is to stretch the fabric as tight as possible onto the frame without causing it to tear.
Stretching the silk screen fabric material as tight as possible allows the fabric to remove cleanly (pop) from the skateboard deck once the ink has been spread onto the deck. Creating the cleanest image possible. You also want to make sure you have no ripples or kinks in the fabric and the frame is level and square or it will ruin the artwork.
I have also attached fabric starting from the center of a frame and worked my way out from there.
I don't know if this technique will work with this kind of press though - experiment!
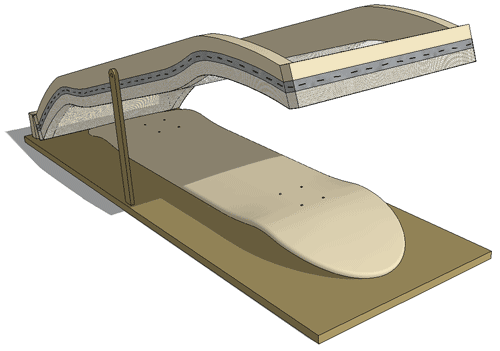
Once you have the frame assembled and the third end attached to the base, place two hinges about 6 inches apart on the top of the end attached to the base, centered.
You can use a variety of hinges here, although there are specific hinges made for silk screen presses which can lock the frame in place and also allow quick removal of the frame. Something to look into if you're going to be using your silk screen press often.
These hinges may be obtained at the previously mentioned art supply stores.
Place the previously completed silk screen press frame onto the base and make sure the hinges line up perfectly, then attach them to the frame, then to each other.

Test out the frame to be sure it swings freely without resistance.
In order for the silk screen press to work effectively, you will need a way of keeping the deck securely in place while applying the ink.
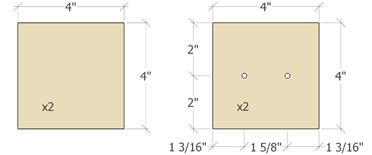
That's where these deck guides come into play. Make two of these little squares by cutting a piece of 3/4" wood to the size shown above and placing two 3/16" dowel rods into the holes drilled.
Once assembled, place a deck onto the base of your new silk screen press and line up the dowel rods with the truck holes in the skateboard deck. Mark the location with a sharpie or pencil and attach them to the base with 1 1/4" screws. Be sure to double check each one after attaching them so they line up.
If done properly, these will hold the deck securely in place while printing the graphics.
Add a little wooden kickstand that's about a foot long in the center of the press to hold it up while removing the decks and you are done.
You may have to do some tweaking and a little trial and error to get what works for you but that's all there is to it. The article on how to actually screen the decks should be on it's way or you can locate one of the many on the net.
(source from DIYSKATES.COM)
 Ow Yeah!! Peppermint Fun Driven skateboard company akhirnya mengisi awal tahun dengan pengadaan produk barunya, seperti T'shirt dan skateboards deck...sampai sekarang kita kita masih bingung siapa owner dari peppermint skateboards ini sebenarnya...
 Peppermint skateboards deck
 Peppermint White Stripe tee
 Black Mint Tees
Did you know Converse had a skateboarding sub-brand? Wow, I didn’t know that. But then again, I don’t know very much. But what I do know is that this “CVO” sneaker is part of their Fall 2010 drop that includes black suede with a one-piece toe. A simple two-tone black and white shoe for you. Now all we gotta’ do is wait.

 Yihaa...banyak orang g tau siapasih orang dibalik LEGALSKATEFIT & LOVEProduction...
 hahaha..itulah kata2 yg pertama terlintas di benak gw ketika gw melihat dia...